For ambitious game designers, Roblox Studio, the powerful game development platform within the renowned online gaming platform Roblox, is a portal to a world of limitless possibilities. Roblox Studio offers a user-friendly interface and a rich range of tools to bring your imagination to life, whether you’re a seasoned developer or a newbie with a passion for game design.
We will go into the principles of Roblox Studio and bring you through the process of building custom games in this detailed guide. This article will provide you with the knowledge and abilities to go on an exciting adventure into the domain of Roblox game development, from creating locations and scripting gameplay mechanics to publishing and sharing your works with millions of people worldwide. So take out your virtual tools and let’s get started!
- What is Roblox Studio?
- What can you create with Roblox Studio?
- How to Install Roblox Studio
- How to Create a New Project in Roblox Studio?
- Exploring Roblox Studio
- Building Objects in Roblox Studio
- Building Objects in Roblox StudioUsing the tools in Explorer in Roblox StudioCreating blocks, models, and scripts in Roblox StudioWhat are scripts? in Roblox StudioHow to add scripts to objects in Roblox Studio
- Using the tools in Explorer in Roblox Studio
- Creating blocks, models, and scripts in Roblox Studio
- What are scripts? in Roblox Studio
- How to add scripts to objects in Roblox Studio
- Testing Games in Roblox Studio
- How to publish Games in Roblox Studio?
What is Roblox Studio?
Roblox Studio is a free software programme that allows you to design your own Roblox games and experiences. It is compatible with both Windows and Mac systems.
Roblox Studio is a powerful tool that lets you construct whatever you can think of. You may create entertaining and interesting games, worlds, and experiences with its straightforward UI and complete collection of tools.
Roblox Studio provides everything you need to create your next amazing game, whether you are a novice or a seasoned developer.
Here are some of Roblox Studio’s features:
- A strong physics engine for creating realistic and immersive experiences.
- A full toolkit for creating objects, textures, and animations.
- A built-in scripting language for adding logic and interactivity to your creations.
- A large library of components for creating games, including models, textures, and audio.
- A robust developer community that is always willing to help
What can you create with Roblox Studio?
Roblox Studio is a free and immersive creative engine that lets you make whatever you can think of. It can be used to make games, experiences, and simulations. Here are some examples of what Roblox Studio can create:
- Games: From basic platformers to complicated role-playing games, you can develop a wide range of games.
- Virtual tours, instructional programmes, and even social gatherings can be created as interactive experiences.
- Simulations: You can simulate real-world events or scenarios such as driving a car, piloting a plane, or even running a business.
Roblox Studio is a great tool for creating whatever you can think of. If you have a creative mind, Roblox Studio is the place to realise your visions.
How to Install Roblox Studio
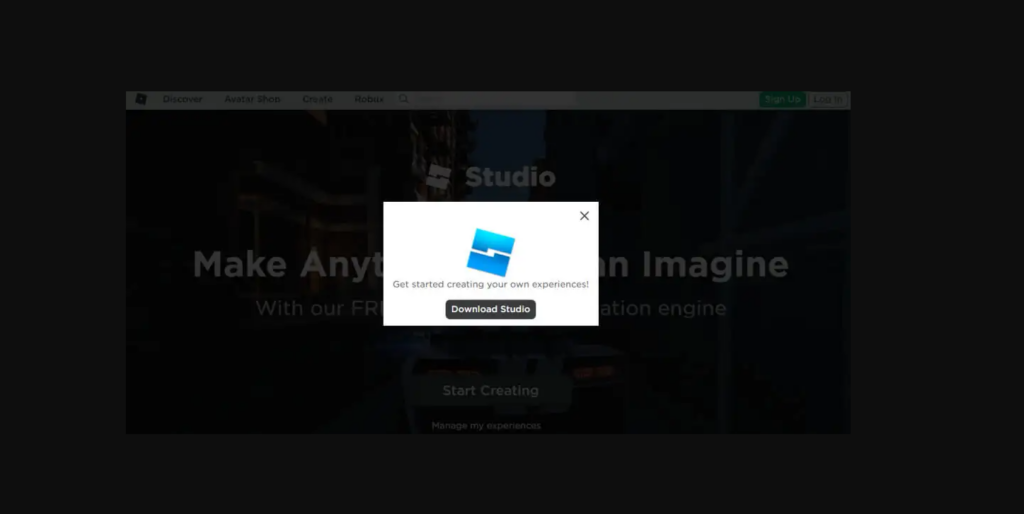
- Go to www.roblox.com to access the official Roblox website.
- Click the “Download Studio” button in the upper right corner of the page.
- You’ll be taken to the Roblox Studio download page. Select the “Start Creating” option.
- The download process should begin automatically. If it does not, click the “www.roblox.com” button one more.
- When the download is finished, locate the downloaded file (often titled RobloxStudioLauncher.exe) and double-click on it to launch the installer.
- Install Roblox Studio by following the on-screen instructions. You may be required to choose a destination folder and agree to the terms and conditions before proceeding with the installation.
- When the installation is finished, you can run Roblox Studio by clicking on the desktop shortcut or searching for it in the Start menu.
- When you first launch Roblox Studio, you will be prompted to log in to your Roblox account or create a new one. If you do not already have an account, you can create one for free.
- Once logged in, Roblox Studio will launch, allowing you to begin designing your own games, settings, or experiences.
How to Create a New Project in Roblox Studio?
- On your PC, launch Roblox Studio. You may find it in the Start menu or by using a desktop shortcut if you have one.
- The Start Page will appear once Roblox Studio is launched. Then, at the top of the window, select the “New” tab.
- There are several project templates to pick from in the “New” tab. These templates serve as a jumping-off point for your project. Choose the template that most correspond to your intended game or experience. If you wish to start from scratch without any pre-made elements, you can use the “Empty Baseplate” template.
- After you’ve decided on a template, click the “Create” button. Roblox Studio will now generate a new project based on the template you selected.
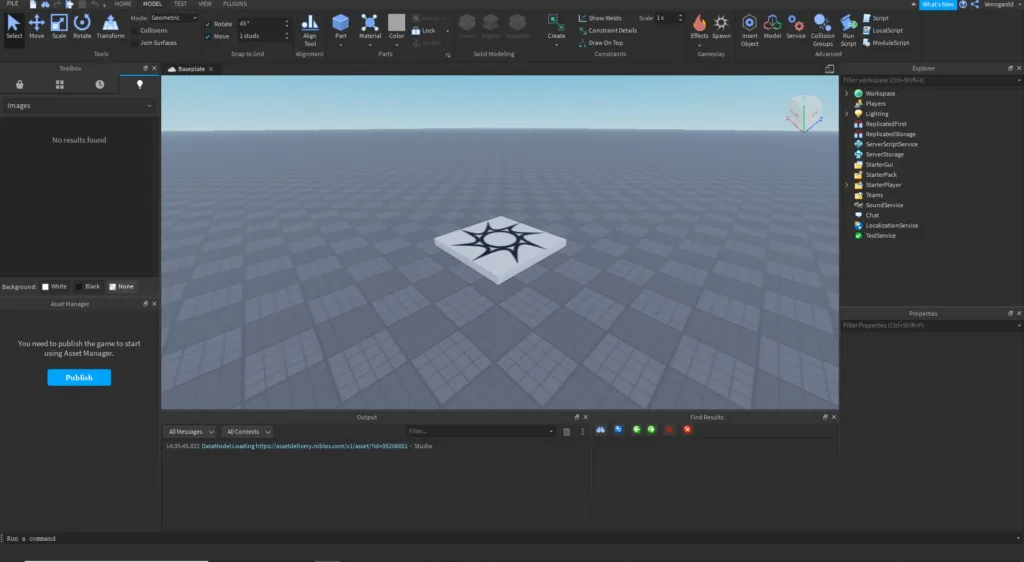
- The Roblox Studio interface will appear, with several panels and windows displayed. The Workspace, Explorer, Properties, and other essential panels will be shown.
- You’ll construct and design your game or experience in the Workspace section. To construct the required gameplay, you can combine various elements such as parts, models, and scripts.
- The Explorer panel displays the hierarchy of your project and allows you to navigate through different items and their properties.
- The Properties panel displays the selected object’s properties, allowing you to customise and adjust its behaviour.
- Use the Toolbox panel to access a variety of assets, scripts, and tools for enhancing your project. You can add items from the Toolbox to your game by dragging and dropping them into the Workspace.
- Select items in the Workspace or Explorer panels and alter their properties in the Properties panel to customise and edit your project. Scripts can also be used to add interactivity and functionality to your game.
- Save your project on a regular basis by selecting “Save” from the “File” option at the top of the Roblox Studio window or by using the keyboard shortcut Ctrl+S (Cmd+S on Mac).
- Click the “Play” button at the top of the Roblox Studio window to run your project. This will start the game in preview mode, allowing you to play and test your design.
Exploring Roblox Studio
When you launch Roblox Studio and begin working on a project, you’ll notice the Workspace panel, which is an important part of the user experience. The Workspace panel allows you to create and design your game or experience by dragging and dropping objects into the virtual world. Here’s a quick rundown of the Workspace and its primary components:
- Baseplate: The Baseplate is the Workspace’s default ground. It serves as the basis for your game or experience. If you want to create your own landscape, you can build on top of the Baseplate or remove it.
- Parts: In Roblox Studio, parts are the basic construction blocks. To build various constructions in your game, you can generate, move, resize, and rotate elements. Parts can be used to represent walls, floors, platforms, or any other objects that you choose to incorporate.
- Models are collections of parts and other items that have been grouped together. Models can be created and used in your game to organise complex structures or reusable components. Models can be moved, resized, and rotated in their entirety.
- The Explorer panel shows a hierarchical view of all the elements in your game or experience. It lets you to navigate through the many components, such as parts, models, scripts, and so on. Using the Explorer, you may select, alter, and manage objects.
- Properties: The Properties panel displays a detailed view of the selected object’s properties and attributes. Objects’ size, position, appearance, physics, and scripting attributes can all be customised. You may fine-tune and manage the behaviour of your game objects using the Properties section.
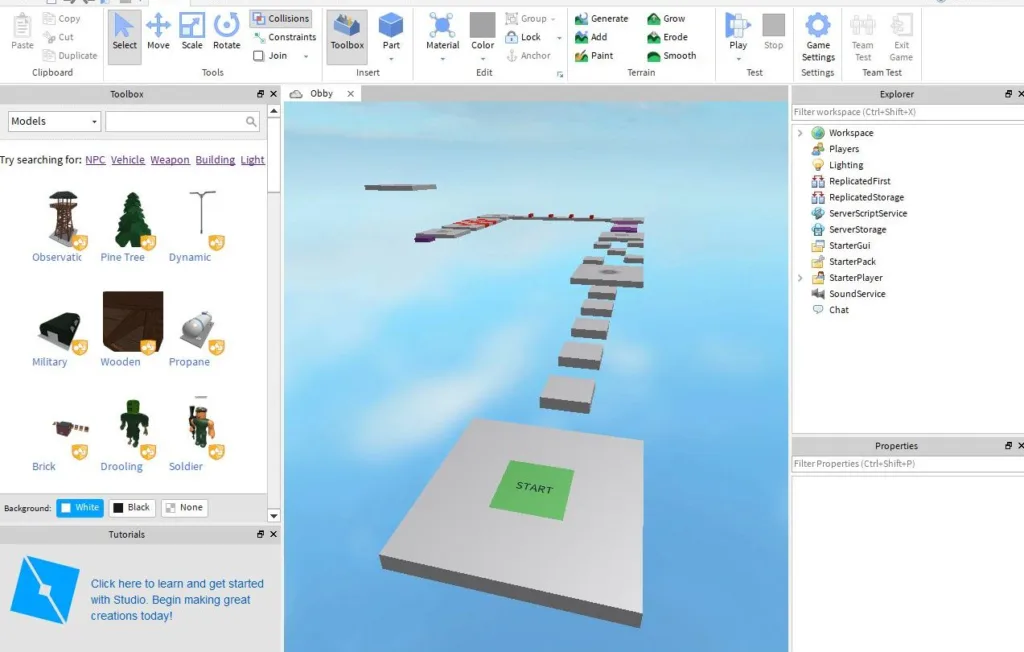
- The Toolbox panel contains a large selection of assets, scripts, plugins, and other tools that you may utilise to improve your project. You can search for specific things, drag and drop them into the Workspace or Explorer, and change their characteristics to meet your requirements.
- Viewport: The Viewport is the main window where you can visualize and interact with your game or experience. It provides a 3D view of your project, allowing you to navigate, pan, zoom, and rotate the camera to inspect and adjust objects.
Within Roblox Studio, you may build and manipulate objects, organise your project’s hierarchy, customise object properties, and bring your game or experience to life by using the Workspace panel and its accompanying components. Experiment with various items, explore the available tools and assets in the Toolbox and let your imagination run wild to create exciting games and immersive landscapes.
Building Objects in Roblox Studio
Creating items in Roblox Studio is an essential component of developing any game or experience. To build and customise items in the virtual world, you can utilise a variety of tools and approaches. Here is a step-by-step tutorial for creating things in Roblox Studio:
- Open Roblox Studio and your project.
- The Baseplate, which acts as the default ground, may be found in the Workspace panel. You can construct on top of it or take it away to make your own terrain.
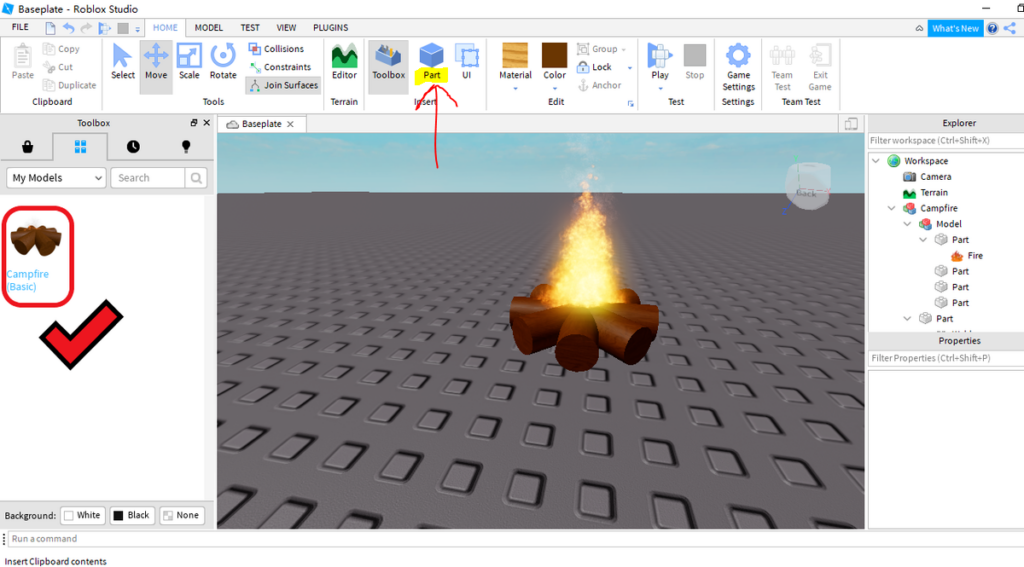
- Click the “Part” button in the Home tab of the Roblox Studio toolbar to add a simple object like a part. You can also use the shortcut key “P” on your keyboard.
- To put the part, click anywhere in the 3D Viewport. You can resize the part by clicking and dragging it, or you can use the Scale tool in the Home tab to fine-tune its size.
- To move the part, click on it in either the 3D Viewport or the Explorer panel. Then, from the Home tab, select the Move tool or click the shortcut key “W” to activate it. To relocate the part within the workspace, click and drag it.
- Select the part and use the Rotate tool from the Home tab to rotate it, or hit the shortcut key “E” to activate the Rotate tool. To rotate the part in the appropriate direction, click and drag on the coloured rotation handles.
- To duplicate a part, select it and then hit the Duplicate button in the Home tab or the shortcut key “Ctrl + D” (Cmd + D on Mac). This will duplicate the selected portion, which you may then move and change as needed.
- You can use the numerous building tools accessible in the Model tab of the Roblox Studio toolbar to create more complicated buildings. Union, Negate, and other tools allow you to combine or change many pieces to create elaborate designs.
- Select your items and adjust their parameters in the Parameters tab to apply new materials, colours, and textures to them. You can, for example, change the colour of a part by modifying its BrickColor property.
- Click the “Play” button in the Roblox Studio toolbar to test your object in-game. This will start a preview of your game, allowing you to interact with and evaluate the items you’ve created.
Remember to save your project on a regular basis by selecting “Save” from the “File” menu or by using the shortcut key “Ctrl + S” (Cmd + S on Mac).
Building Objects in Roblox Studio
Using the tools in Explorer in Roblox Studio
In Roblox Studio, the Explorer panel displays a hierarchical view of all the items and components in your game or experience. It enables you to move through the various elements and access their properties, scripts, and other features. Furthermore, the Explorer panel has a number of tools to assist you in managing and manipulating objects. Here’s how to use the tools in the Explorer panel:
- Choosing Objects: To pick a Workspace object, click on it in the 3D Viewport or on its name in the Explorer panel. The thing you’ve chosen will be highlighted.You can select numerous objects by holding down the Ctrl key (Command on Mac) and clicking on each one. This is useful for doing operations on numerous objects at the same time.
- To pick a Workspace object, click on it in the 3D Viewport or on its name in the Explorer panel. The thing you’ve chosen will be highlighted.You can select numerous objects by holding down the Ctrl key (Command on Mac) and clicking on each one. This is useful for doing operations on numerous objects at the same time.
- Locating Objects: To find specific objects in your project, use the search box at the top of the Explorer window. Simply enter the name of the object or a term connected to it, and the Explorer will filter the results accordingly.
- To find specific objects in your project, use the search box at the top of the Explorer window. Simply enter the name of the object or a term connected to it, and the Explorer will filter the results accordingly.
Creating blocks, models, and scripts in Roblox Studio
Making Parts (Blocks):
- Click the “Part” button in the Home tab of the Roblox Studio toolbar, or press the shortcut key “P” on your keyboard. To put the part, click anywhere in the 3D Viewport. Using the tools in the Home tab, you can resize, rotate, and customise the appearance of the part. Repeat the process to make additional blocks or elements for your game as needed.
- To put the part, click anywhere in the 3D Viewport. Using the tools in the Home tab, you can resize, rotate, and customise the appearance of the part.
- Repeat the process to make additional blocks or elements for your game as needed.
- Making Models: Models are collections of parts and other items that have been grouped together. They enable the creation of complicated structures or reusable components. Hold down the Ctrl key (or Command on a Mac) and click on each part to select it for your model. Right-click on the components you want to group and pick “Group” from the context menu. This will generate a model with the selected pieces. Renaming the model is as simple as right-clicking on it in the Explorer panel and selecting “Rename” from the context menu.
- Models are collections of parts and other items that have been grouped together. They enable the creation of complicated structures or reusable components.
- Hold down the Ctrl key (or Command on a Mac) and click on each part to select it for your model.
- Right-click on the components you want to group and pick “Group” from the context menu. This will generate a model with the selected pieces.
- Renaming the model is as simple as right-clicking on it in the Explorer panel and selecting “Rename” from the context menu.
Remember to properly position your blocks and models within the workspace to achieve the ideal layout for your game. To change their position and orientation, utilise the Move and Rotate tools in the Home tab. Additionally, in the Properties tab, you may fine-tune the properties of blocks, models, and scripts to fine-tune their behaviour and appearance.
You may design dynamic settings, define gameplay mechanics, and add custom functionality to your game or experience with Roblox Studio by adding blocks, models, and scripts. To bring your concept to life, experiment with different combinations, test your creations and iterate on your designs.
What are scripts? in Roblox Studio
Scripts are a critical component in Roblox Studio for adding interaction, behaviours, and custom functionality to your games and experiences. Scripts are written in Lua, a lightweight and adaptable programming language, and are essential in developing dynamic gameplay and immersive worlds.
How to add scripts to objects in Roblox Studio

Follow these procedures to add scripts to objects in Roblox Studio:
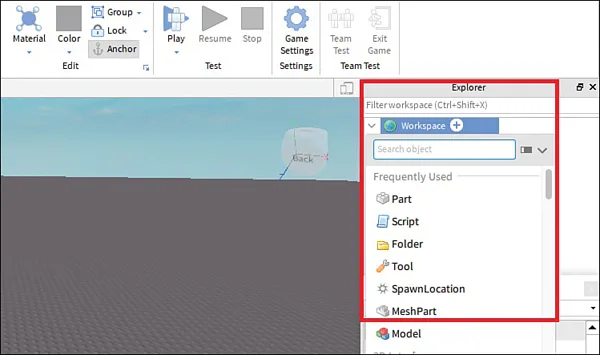
- Load your game or build a new one in Roblox Studio.
- Locate the object to which you wish to add a script in the Explorer panel. This can be a part of your game, a model, a player character, or any other thing.
- Right-click the object and select “Insert Object” from the context menu. From the submenu, choose “Script.” This will generate a new script object in the Explorer panel under the selected object.
- To open the script editor, double-click on the newly created script item in the Explorer panel.
- In the script editor, you can write Lua code to define the object’s behaviour and functionality. You can, for example, write code to handle events, perform actions, or alter object properties.
- Save your script by selecting “Save” from the “File” menu or by pressing “Ctrl + S” (Cmd + S on Mac).
- When you return to the game editor, you’ll notice that the script object has been associated with the selected item in the Explorer panel. When the game starts, the script will run and change the behaviour of the object as stated in your code.
Please keep in mind that you can attach numerous scripts to the same object or spread scripts among different objects in your game as needed. In the Explorer panel, each script will have its own script object.
Remember to test your game to see how the script works. You can enter Play mode by clicking the “Play” button in the toolbar and interacting with your game to see how the scripts work.
You can customise the behaviour, interactions, and usefulness of your game pieces by adding scripts to objects in Roblox Studio. Experiment with alternative code and script setups to provide gamers with exciting gameplay experiences.
Testing Games in Roblox Studio
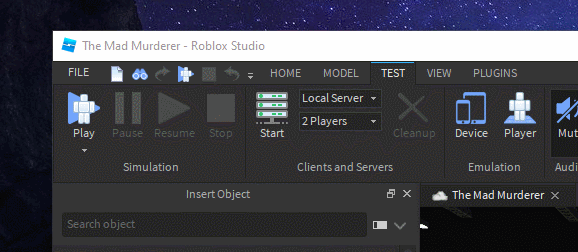
You can test your game in Roblox Studio by doing the following:
- Load your game project into Roblox Studio.
- Check that your game has all of the necessary scripts, objects, and assets.
- Click the “Play” button in the Roblox Studio toolbar. This will start the game in Play mode.
- You can interact with your game and test its functionality once it is in Play mode. Here are some pointers to help you test your game: To test movement and physics, move your character or any controlled objects around. Test buttons, switches, and other interactive objects to see if they perform the expected actions. Any game mechanic, such as collecting items, completing objectives, or battling enemies, should be tested. Check that scripts are running as expected and that there are no errors or unusual behaviour in the Output window. Test various scenarios and edge cases to ensure your game is robust and can handle a variety of situations.
- To test movement and physics, move your character or any controlled objects around.
- Test buttons, switches, and other interactive objects to see if they perform the expected actions.
- Any game mechanic, such as collecting items, completing objectives, or battling enemies, should be tested.
- Check that scripts are running as expected and that there are no errors or unusual behaviour in the Output window.
- Test various scenarios and edge cases to ensure your game is robust and can handle a variety of situations.
- You can make real-time changes to your game while in Play mode. You can, for example, move objects, change properties, or change scripts. These modifications will take effect immediately, without the need to restart the game.
- Click the “Stop” button in the toolbar to exit Play mode and return to the editor.
- Examine and evaluate your game’s performance, gameplay experience, and any issues or bugs discovered during testing.
- Based on your testing findings, make the necessary adjustments, bug fixes, and optimisations.
- As you continue to develop and refine your game, repeat the testing process to ensure that each update maintains or improves the overall quality and gameplay experience.
You can identify and address any issues or bugs, fine-tune gameplay mechanics, and ensure that your game functions as intended by testing it in Roblox Studio. Regular testing and iteration are essential for providing your players with a polished and enjoyable gaming experience.
How to publish Games in Roblox Studio?
Follow these steps to publish your game in Roblox Studio and make it available for others to play:
- Ascertain that your game is complete and thoroughly tested. Ensure that all of the required assets, scripts, and gameplay elements are in place.
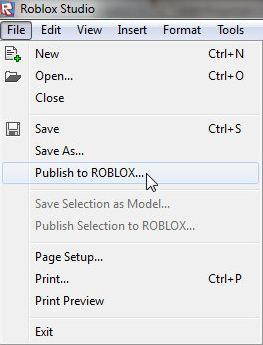
- In Roblox Studio, select “Publish to Roblox” from the “File” menu, or use the shortcut key “Ctrl + Shift + P” (Cmd + Shift + P on Mac). This will launch the Publish Place dialogue box.
- Before publishing your game, you can set various options and configurations in the Publish Place window. The following are the key settings to consider: Place Name: Give your game a descriptive and unique name. Give a detailed description of your game, emphasising its features, gameplay, and any special instructions. Choose the genre that best describes your game. Allowed Gear: If applicable, specify any specific gear items that players may use in your game. Allowed Gear Genres: Select the gear genres that are permitted in your game, if any. Game Icon: Choose or upload an image to serve as your game’s icon. Privacy: Choose whether your game’s privacy settings are public, friends-only, or private. Maximum Player Count: Define the maximum number of players who can join your game at the same time. Allow Copying: Choose whether or not players can make copies of your game.
- Place Name: Give your game a descriptive and unique name.
- Give a detailed description of your game, emphasising its features, gameplay, and any special instructions.
- Choose the genre that best describes your game.
- Allowed Gear: If applicable, specify any specific gear items that players may use in your game.
- Allowed Gear Genres: Select the gear genres that are permitted in your game, if any.
- Game Icon: Choose or upload an image to serve as your game’s icon.
- Privacy: Choose whether your game’s privacy settings are public, friends-only, or private.
- Maximum Player Count: Define the maximum number of players who can join your game at the same time.
- Allow Copying: Choose whether or not players can make copies of your game.
- Once you’ve completed the configuration, click the “Upload” button in the Publish Place window. Roblox Studio will package your game and upload it to the Roblox platform.
- Depending on the size of your game, the publishing process may take some time. The Output window allows you to track the progress.
- When the publishing process is finished, you will be notified that your game has been successfully published. The game is now available for players to access and play on the Roblox website.
- You can find your published game by going to the Roblox website and scrolling down to your profile. You can view and manage your games from there, as well as update descriptions, configure settings, and respond to user feedback.
Resources for learning more about Roblox Studio:
Further Read: