
Last Updated on June 25, 2023 by Ajay Kumar
Want to capture what you’re seeing on your Mac, Windows, Linux, or Android? Most of Android Phones and PC OSs come with built-in Screenshot features allowing you to capture your screen with just a Few Clicks, But, there are many other third-party Apps, and Browser extensions to do so. Here’s How To Take Screenshot in macOS, Chrome OS, iPhone/iPad OS, Windows, Linux, Laptop, and Android.
- How to Take Screenshot on Android
- How to Take Screenshot on macOS Laptop/ Desktop
- How to take Screenshot in Linux Laptop/ Desktop
- How to Take Screenshots on iPhone/iPad
- How to Take Screenshots on Apple Watches
- How to take a ScreenShot on Windows 10 Laptop/ Desktop
- How to take Screenshot on Chromebook Laptop
- How to take Screenshot in Web Browsers
How to Take Screenshot on Android
Unlike Apple Operating Systems, screenshot functions are not uniform in Android devices, there are a lot of Ways to Take Screenshots on Android Phonesvary according to the Company of the Phone, and their Operating Systems. Most Android Devices lets you take Screenshots by Pressing the Home, and Volume Down buttons (if your phone has physical buttons).
You can also take a Screenshot by Asking your Phone’s Voice Assistant by saying ‘Take a Screenshot” to Bixby in Samsung, Siri in Apple, and Google Assistant or Alexa.
Some Samsung phones also sport Gestures to take a screenshot, you can add any gesture such as swiping left to right, right to left, up to down, or down to up. Set this up in Settings > Advanced Features > Palm swipe to capture.
The easiest way to take a screenshot is by using the Floating widget, which can be seen in the latest Samsung UI, MIUI, Redmi UI, Color OS, and some other Android Phone UI.
If any of the above-mentioned Ways are not available for you, then unfortunately you have to use Third Party Applications to do so. Most Screen Recording Apps let you take Screenshots. You can use the DU Screen Recorder or AZ Screen Recorder Applications that can be downloaded from Playstore. (update: DU Screen Recorder is not available in Playstore.)
How to Take Screenshot on macOS Laptop/ Desktop
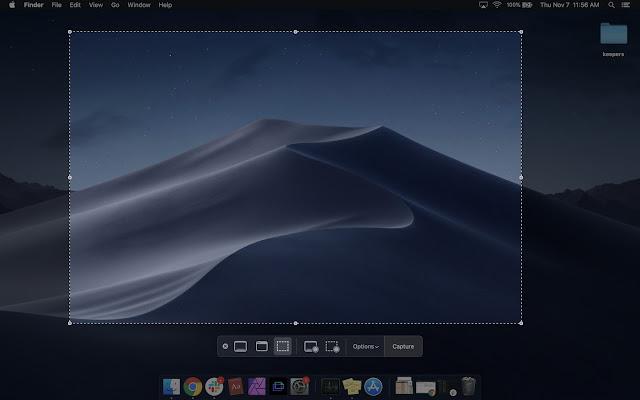
The latest macOS, known as macOS Mojave gives the user more control over taking a Screenshot. With the macOS, Mojave Screenshots can be talked by Simply Pressing Command+Shift+5, or navigating to LaunchPad > Other > Screenshot.
This then opens a Screen Capture window where you can choose to Capture a different part of your screen, or taking a screenshot of your whole screen, take a screenshot with a timer, record a video, or even take a screenshot of a particular Window.
To Take a Screenshot in macOS by Keyboard, use any of the following shortcuts given below:
- Command + Shift + 3 to capture the entire screen
- Command + Shift + 4 to convert the cursor into a crosshair to capture a certain part of the screen
- Command + Shift + 5 to capture a specific Window
How to take Screenshot in Linux Laptop/ Desktop
Taking Screenshots in Linux is not a Big Deal. You can choose between Taking a screenshot of a Whole screen, a Single Window, or a Custom Area on your Screen.
Print Screen feature is also there in the Linux, Use Alt+Print Screen to screenshot a Specific Window, or Use Shift+Print Screen to select a custom area to capture.
- Print Scrn to take a screenshot of the desktop.
- Alt + Print Scrn to take a screenshot of a window.
- Shift + Prt Scrn to take a screenshot of an area you select.
How to Take Screenshots on iPhone/iPad
In Apple Devices having the Home Button (such as 2020 iPhone SE), you can take the Screenshot by simply pressing the Home Button with Sleep/Wake button, You’ll hear the camera shutter sound (if on), and a flash on your screen.
For Devices without Home Button, Press the Sleep/Wake Button with the Volume up button at the same time to capture the screenshot.
To take a Screenshot on your iPhone/iPad Devices:
- swipe up with Apple Pencil from either corner at the bottom of your iPad
- Now you can edit or markup your screenshot
Third-Party Apps can also be used to Take Screenshots on iPhones/iPad Devices. Such as Lonely Screen which lets you share your screen via AirPlay and record or capture anything on your mobile device’s screen from the computer.
How to Take Screenshots on Apple Watches

Surprisingly, Screenshots can also be talked in apple Watches once they are turned on in the settings menu. To enable this feature open Apple Watch App on your iPhone, navigate to My Watch > General > Enable Screenshots, and turn it on.
Once turned on, Hold the Side Button and click the Digital Crown simultaneously to capture a Screenshot, the Screen will flash, and the camera shutter will go off like the iPhone.
How to take a ScreenShot on Windows 10 Laptop/ Desktop
The Simplest Way to take a screenshot in Windows 10 is by using the Print Screen button present in the top-right corner of almost every keyboard. Once you clicked it, you have an Image copied to your clipboard which then can be pasted into Paint, Word, or any other image-editing program.
And, if you have the latest version of Windows 10, you can capture a screenshot of a specific portion on your screen by pressing the Windows key + Shift + S which will dim the light of your screen, and the cursor of your mouse will change allowing you to select portion by dragging.
Another method is by pressing the Windows key + PrtScn, which will save the entire screen as an image file in the “Pictures” folder on your PC.
Using Snip & Sketch
Snip & Sketch is similar to Microsoft’s Snipping Tool. Start the Snip & Sketch tool from the Start menu, and in the Mode section select what kind of screenshot you want. Click New and your screen will freeze. You can then use the mouse to create the screenshot. The screenshot will then appear in the Snipping Tool window. When you’re done, click “File” and then click “Save As” to save the completed screenshot to your computer.
Using Windows Game Bar
Another exclusive feature that makes Windows 10 special, is the Windows Game Bar. Which is Software to record Gaming sessions in Windows 10, it can be used to record any action and capture screen grabs. Open the tool by pressing Windows Key+G, then tap the camera button in the Capture section to save a screenshot.
How to take Screenshot on Chromebook Laptop
Chromebook has a unique button known as Window Switch Key. This button is located at the top of the keyboard with an icon for the Camera. If you want to take a screenshot of your whole screen, press the Ctrl+Window Switch Key, and Ctrl+Shift+Window Switcher to get a screenshot of a specific section.
However, in Standard Keyboards you won’t see a Windows Switch Key, you have to use Ctrl+F5 and Ctrl+Shift+F5 instead. And when the Chromebook is in tablet mode, a Screenshot can be taken simply by pressing the power and volume down buttons.
How to take Screenshot in Web Browsers
Almost every major Web Browser supports Extensions to add extra functions to your Browser according to your Choices. Use the following Web Browser Extensions to take screenshots in your Web Browsers:
- LightShot: Free Chrome, Firefox, and Opera Extensions that can be used on mac(s) and Windows to take Screenshots.
- Nimbus Screen Screenshot: The Nimbus Screen Screenshot extension is a free alternative extension of LightShot Extension for Chrome, Firefox, and Opera Browsers
- Awesome Screenshot: This is the best Free Browser extension to take a screenshot in Chrome, Firefox, and Opera Browsers